All Fired-up : Kelly Kettle
Will it suit you?
OK Let’s get straight to the point: This is a review of a stove that you can use pretty much any time you are outdoors: for pic-nics, camping, trekking or just making a hot drink when you’re out in the countryside. You might be fishing, bird-watching or taking a pit-stop from enjoying a bike, motorbike or car drive around the country.
It’s different because it uses fuel that you gather easily from the countryside. Anything natural you can find from the place you’ve decided to stop; from twigs to bark, pine cones to… well whatever you can find that will burn. And that’s surprisingly simple to do.
Sounds a mad idea doesn’t it? But I definitely wanted to see if it was practical. So I contacted the makers Kelly Kettle, based in Co. Mayo in Ireland. And asked them point blank would they give me one to try. As promised I’ve used it all the time. After a few months I’d found it such an appealing experience, that to improve the quality of this review, I added a few accessories purchased anonymously online. And discovered it suits me perfectly. The question now is: Will it suit you?
Frazzled hair, blistered nose and scalded fingers…
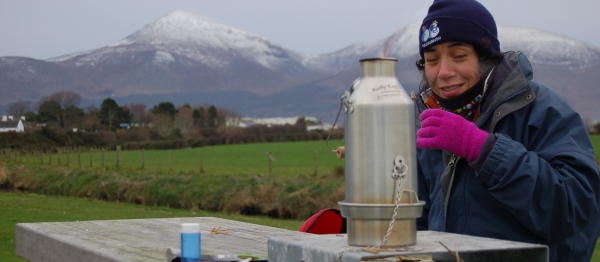
We all know how to light a modern stove, in the kitchen or in the countryside. We turn on the fuel and add a spark or a flame. Put the a kettle of water on top, and away we go, hot drink on the way. Of course, if you’re outdoors, you need to have brought the fuel with you. If it’s gas you need to carefully fit and remove the canister, and dispose of it safely when done. If it’s petrol you’ll need to fill the tank, pump and prime, and be careful not to singe your eye-brows in the lighting; and be careful still, when you store the liquid in your home. You’ll also probably find you need to carry and use a windshield if you really want to boil your water efficiently out in the open. I know all this from years of experience. I’ve been there, so I’m no stranger to frazzled hair, blistered nose and scalded fingers. Easily done. When you realise all this weighs against what we think of as the convenience of the modern-ish camping stove, you realise that you’ve simply become used to doing it. It’s not that convenient at all.
So I can see you thinking…
Yeah, OK. Maybe they’re not that convenient,
but I really don’t like the idea of struggling to light a fire to boil a kettle…
Struggling to light the Kelly
 Truthfully it was never a struggle. And honestly, quite fulfilling. I finally understand now why so many men I know hate cooking but love to barbeque. A bit of practice in the back yard, right at the very beginning and I had it cracked. There are numerous skills we all master in our daily lives that I find considerably harder than lighting this stove. And in the same way there are good and bad ways to get the best from your petrol or gas stove, the same is true of using foraged fuel. Once you have those few in your head it’s easy. More than that it’s a really enjoyable activity that adds to your outdoor experience.
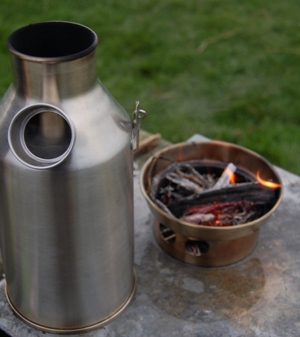
How it Works
It’s a complete device for boiling water. You don’t really need anything else (unless it’s a pot for cooking) and it’s designed to be very easy for you to make and keep a strong flame from your fire. It has just two key components: the fire pit or base and the chimney.
Using your foraged fuel, you light your fire in the base, which has an air hole (or two) in the side. Then you place the chimney on the base, over the fire. This helps to sustain a strong fire, as the design draws the air in through the hole in the side of the base, and accelerates it over the burning material up through the chimney.
Except it’s not just a simple chimney. It’s really a bottle with a chimney running up the centre of it. You put your water in the bottle, put your bottle (chimney) on the base and in a very few minutes the water boils. Everything is well made, straightforward and simple to use. There are no moving parts (OK, I didn’t count the handle), no “o” rings, no pumps, no jet pricker, no grease or maintenance tools, no mandatory annual safety service required. It doesn’t take batteries and you won’t need a solar charger. You do need a means to light the fire. Here’s a brief video from the US that gives you the idea…
What to choose?
The Kettles are made in both aluminium and stainless steel. Although aluminium is lighter, I chose the heavier stainless simply because it’s a more robust material. I didn’t want to reduce my water capacity by putting dents in the chimney through my rough mountain use. I was prepared to carry the extra 200 grams in weight, although weighing in at only 540 grams the aluminium mini Trekker was tempting. But the robust stainless steel, has survived rough end-of-day handling and more than a few drops, without any noticeable affects.
Expecting to be solo most of the time I chose the Trekker size kettle which boils a little over half a litre of water, usually in three or four minutes and weighs about 725 gram when empty. Enough hot water for a big mug of coffee to kick-start me in the morning, for a dehydrated meal or a bain-marie lunch and I’ve even seen someone cook pasta in it. Then with a little bit of conscious management, and a bit of DIY kit, Shash my wife and I also found that the Trekker worked well for two of us, for cooking dinner of an evening, as well as boiling water:
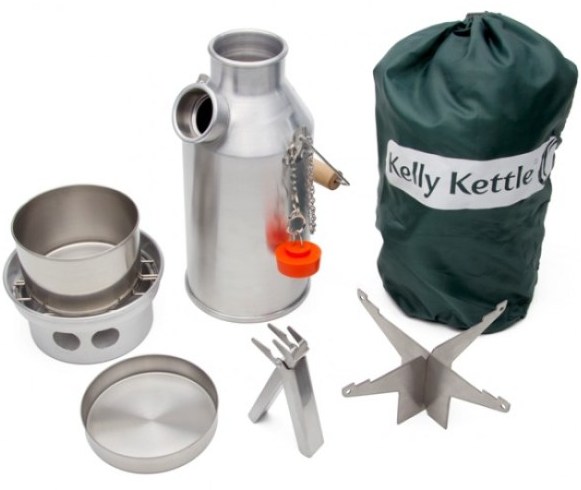
Kelly had also supplied me with the cook-set illustrated here, all in stainless steel and all together with the kettle weighing a tad over a kilogramme. This was great for short solo treks, but I upgraded this to the largest cook-set and the same bit of DIY kit when trekking with Shash; so that a suitable high mountain kit for two of us came to 1250 grams.
The larger size (Base Camp) stainless kettle, at 1.5 litres, triples the capacity of the Trekker. But choosing this would have only put our high mountain kit to about 1750 gram. Remember that’s the entire weight of our cooking kit, pans included, all useable at anytime, because we would have no worries about managing or conserving fuel. It would offer us the advantages of the larger fire-base when on longer treks, and now we would be able to abandon our bit of DIY gear and use the new Hobo Stove accessory designed to work with the kettle base and make pan cooking easier. This combo will still weigh well under 2kgs and should be sufficiently large enough to comfortably suit a group of four or more.
For family picnics and group cook-outs I’d probably suggest the 1.6litre aluminium Base Camp which like the Stainless Steel Base Camp and the 1.3 litre aluminium Scout can also make use of the new Hobo Stove accessory (160 grams). You can view all of these available kettles at the Kelly Kettle web site
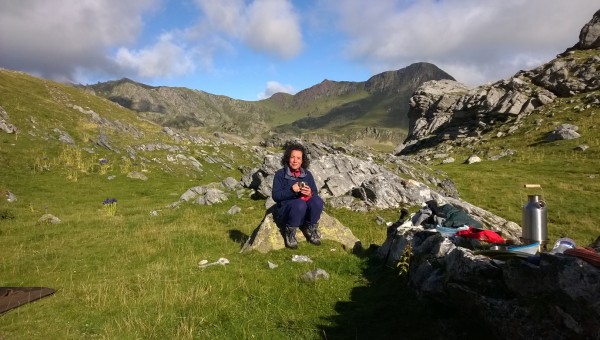
Breakfast for two at 2000 meters managed with the Kelly Trekker.
Affordability
The price of the Kelly kit compares favourably with brand leader stoves that you find in the shops today. Especially when you begin to calculate the cost of adding cook-sets. And of course, with the Kelly there is no requirement to buy fuel. You’ll find the current prices and availability from the links below.
A typical cuppa with my Kelly …
In the next post about the Kelly I’ll describe a typical Irish countryside pit-stop and brew-up with the Kettle, highlighting exactly how I use it, and how I get the best from it. With plenty of advice on getting the fire going easily and perhaps a little chat about cooking.
Product and story links
The Kelly Kettle site and international web-store in Ireland
The Kelly Kettle site and USA web-store
The full Trekker kit illustrated above from Amazon.co.uk
Playing With Fire – How I came to use a real-fire stove


Looks like a neat product. I haven’t heard of using a kettle for bowling water, but I bet it works just as well if not better.
LikeLike
Hi Jarrett, if you are drawing a good flame in the fire-base it takes about 3+ minutes to boil half a litre of fresh snow melt. And it really adds to the pleasure you can get from being outdoors. In fact it boils so quickly, that I often tend not to use the pan rack that goes in the top of the chimney, but just wait til the water boils, then take the kettle off the fire-base and put my cooking pot on. It’s a lot more engaging that a traditional liquid fuel/gas stove.
LikeLike